Wednesday, December 15, 2010

Apply the vacuum bag

Click any picture for a larger view

Before the vacuum bag can be applied, there are a number of things that must be added to the assembly. One item we must make are the resin infusion lines that will allow the resin to spread out over the whole panel. These lines are made out of 1/2 inch ID black plastic water hose available at any hardware store. We drilled 1/8 inch holes right through the plastic hose every 6 inches. You will have to remove any bits of plastic that hang on to the hose after the holes are drilled as they might puncture the bag when the vacuum is applied. To help disperse the resin, the hose is then inserted into a shade cloth cover that runs the whole length of the hose. These covers were made up before hand. 


The line is covered with shade cloth. This cloth has very open pores that will allow the resin to flow with out restrictions. This material is sometimes called "bleeder cloth" because it allows the air inside the bag to move freely to the evacuation lines. 


Here is the first resin line being cut for length. You will also see a line on the outside of the panel, about 1 foot from the edge of the table. This is a length of double sided tape that runs completely around the panel. The bag will attach to this tape and there must be no leaks between joins in this tape. The top cover is still on the tape and will be removed only when it is time to place the bag on the panel.


Next we cover the panel with a layer of peel ply. This material is placed directly on top of the last layer of glass and before any resin lines or shade cloth. When the panel has been infused and cured, the peel ply will make it possible to remove the resin lines, bag, and shade cloth from the panel. Larisa is attaching some shade cloth to the deck edge radius former to ensure good resin penetration and coverage 


Now Steve is attaching the first resin line to the panel. 


Now we attach the second resin line.


And the third and final line goes on.


Tuesday, December 14, 2010

Inside layers of glass

Click on any picture for a larger view

We now place two layers of 10 oz. unidirectional glass, 90 degrees to each other like we did on the outside of the panel. We do not cover the whole panel with glass on the inside as the lower portion, the keel area, is formed later to make a fair round bottom on the hull. This first layer has the strands running from the deck edge radius former towards the keel area as far as the line we saw Steve make on the foam.


Our second layer runs from the stem to the stern and is trimmed to the same line as the other layer.


Here we are. Gel coat on the bottom, two layers of glass, one layer of foam, and the final two layers of glass. Now it is time to bag this puppy.


One of the great things about this method of hull building is you can take as much time as you like. We had a bunch of people working on this panel and got it put together is short order, but if you were working alone, it will take longer. It does not matter. There are no time constraints until you let the resin into the panel. You can fix mistakes, make changes, reassemble the whole panel, there is no pressure.

Placing the foam sheets

Click any picture for a larger view

Here we see the foam laid out on the table with the template on top for marking the foam for cutting. The individual foam pieces are held together with a building product, sometimes called “Gang Plates”. These are steel plates, about 2 inches wide and 4 inches long with lots of sharpened legs formed through them and you drive them into the foam at the junction points to hold the individual panels together. Available at any building store. You do not have to worry about any holes the legs make in the foam as they will be filled with resin during the infusion. Another good idea is to make wiggly lines between each junction so that when you reassemble the panel, all the individual pieces go together in the right places.

The material being used for this project is Divinycell PVC foam, 5/8 inch thick, 80 pound density, cross cut on one side and drilled through. The cross scoring and through drilling helps the resin travel over the foam and through to the other side during the resin infusion process. A good information site with specifications and uses is http://www.diabgroup.com/europe/products/e_prods_2.html This is one manufacturer of foam products. There are others.


A closer look at the “Gang Plates”.


Steve is marking the foam with a line that shows the lower extent of the glass on the inside of the panel. The lower portion of the panel will be formed and therefore does not require glass at this time. This is the first time we see the use of the full length batten. This batten is used to mark fair lines on the panel.


For the foam to fit flat on the glass and the table, we have to cut the rebates into one side of the foam, for the bow and the stern.


All we have to do now is remove the “Gang Plates” and we are ready to put down the inner glass layers. The single line on the panel is the lower limit of glass for the inside of the panel.


Just before we install the upper layers of glass, you can see that the top of the foam close to the deck edge radius former is chamfered. This is to help the glass make a fair transition from the surface of the foam , down into and around the deck edge radius former. Glass does not like abrupt changes and the chamfer helps a lot. 


Sunday, December 12, 2010

Outside layers of glass

Click any picture for a larger view

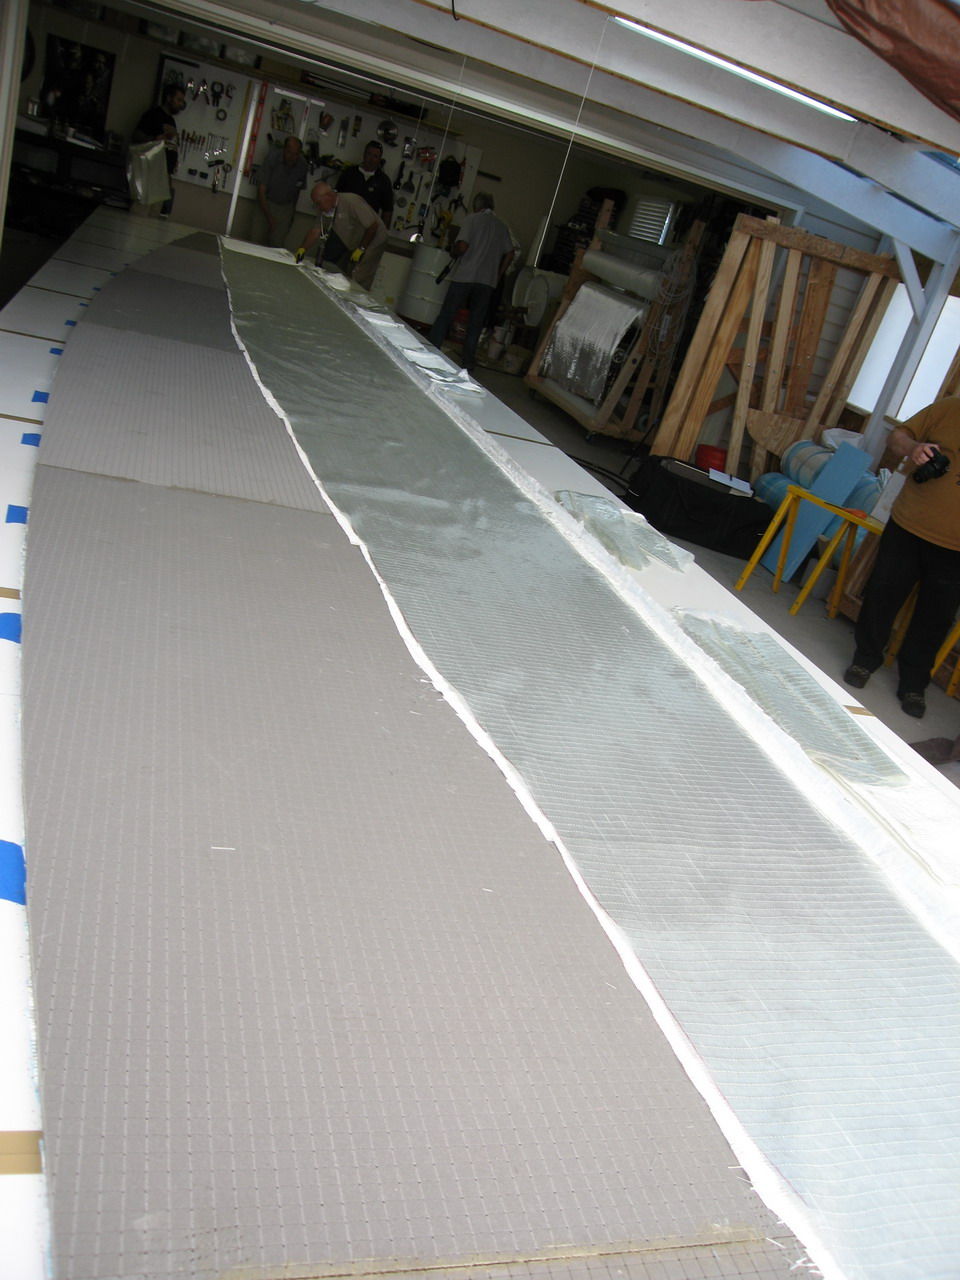
We are ready to put down the first layer of glass. We are using 10 oz. unidirectional glass, two layers on the outside, placed 90 degrees to each other. One advantage of this glass choice, you can buy a larger amount of a single type to get a better discount.

Here is all the glass for the first layer, cut and laid out on the table. The first layer, or outside layer, the strands of glass will be orientated from the deck edge radius to the keel


The individual pieces are laid out and trimmed to fit. You want the glass to cover the whole inside of the deck edge radius former and then trim to the edge. A light spray adhesive makes the job a bit easier as it all wants to slide around a bit. With the spray adhesive, you can keep the glass inside the former and trim to fit.The bottom edge is trimmed to the dotted blue line which is the lower edge of the panel.


The first layer is going down very nicely.


The first layer is complete. The glass extends over the stern rebate template. This is the full size of the panel.


The view from the bow. The glass also extends over the bow rebate template.


The bow rebate template and the deck edge radius former meet. Here you can see the orientation of the glass strands.


Second layer of glass running bow to stern.


Edge must still be placed in to the deck edge radius former.


Thursday, December 9, 2010

Panel Layout

Click on a picture for a larger view.

OK, after we have constructed the table to our satisfaction, we have to lay out all the material to make a panel.

We first have to make a template out of non stretchy material, something like Mylar or anything that will not tear easily or absorb moisture and change shape or size. This template is made from a set of offsets provided by Derek Kelsall.

A set of offsets contain all the measurements for the hull shape. There will be a center line and a design water line and a shear line and all measurements will apply to these lines.

This is what a table of offsets looks like. This is not the table for this project, but you get the idea.


Here is the template laid out on the table. You can see the center line, some station lines and the upper and lower tangent lines. The left edge of the template is the sheer line. On the right side of the template you can see the dart lines in red.


On this next picture you can see the center line, bow profile, first station line, marked O, and the upper and lower tangent lines.  


Before we go too much further, we should talk about this interesting device.


This is how we make the deck edge radius form which allows very easy mating and attachment of the deck to the hull sides. This template is made up by covering a 3 X 3 inch angle of aluminum with packing tape as a release agent. Then we cover the inside of the angle with a couple of layers of 10 oz glass and resin. After it cures, we remove the template from the angle. We now have a 3 X 3 angle made out of glass. We fill the inner section of the angle with a mixture of micro balloons or talk and resin and press it up against a 6 inch diameter piece of PVC pipe that is also covered with wax or a release agent. Removing the pipe after it all cures, leaves you with a template for the deck edge radius. You will need varying lengths of this template so you can make a few at 8 feet long and join them along the sheer edge as you need them.


This is the way the deck and the hull sides go together. You will have to trim one radius to fit the other and then you can glue the two edges together with a modern adhesive. No bolts-no leaks.


Here we are rolling up the template after placing the deck edge radius former in the foreground, The form for the stern rebate on the left of the picture and you can see a dotted outline at the top of the picture that is the bottom edge of the panel.


Now we can see the layout a little more clearly. Deck edge radius former in the foreground, stern rebate template on the left. The blue tape pieces show the outline of the panel.


Here we are preparing for the gel coat to be put down. We have the deck edge radius former on the left, the bow rebate template at the bottom of the picture and the solid blue lines are the edge of the gel coat area. Again, the dotted blue line is the extent of the bottom of the panel.

The bow and stern rebates are to facilitate forming the bow and stern once the two halves are put together. These rebates must be cut into the foam as well.


The gel coat is being rolled on the waxed surface of the table. Since this is the first layer of our panel, it will be on the outside of the hull. This one operation saves many hundreds of hours of tedious sanding and fairing the hull to obtain a smooth finish on the hulls of a 42 foot catamaran.


We want to remove the tape before the gel coat gets too hard as this will give us a nice crisp edge. If you wait too long, you will get a ragged edge which sort of ruins the whole idea anyway.

You can see by the dotted outline of the panel, there is a considerable area that does not have gel coat on it. This area will be under water and gel coat is not used under water.


Look at that nice clean edge. Tape removed at just the right time.


OK, time for the first layer of glass.


Monday, November 15, 2010

Getting started with KSS

Building a boat hull using the KSS principle is very simple once you understand the procedure. It is a little hard to realize how a flat panel, built on a table, can make a hull formation with a rounded bottom and fair curves, but it does work.

I attended the KSS workshop in Tennessee this year and participated in producing half a 42 foot catamaran hull in a ridiculous short amount of time. I know that building a hull is only part of the time required to produce a boat, but after building a 37 foot Searunner, I know that it takes a long time to build a hull using the bulkhead and stringer method that can then be turned over and the work inside the hull gets underway.

I think one aspect of this method that will appeal to an experienced builder is the fact that everything is done dry on a flat surface that is easy to work on. You can reach any position on the table to position material, adjust lines or what ever you have to do by just walking around to the other side. This is a lot easier then walking all over your work and messing up the alignment of foam, glass, etc.

Another advantage is that everything you do is dry. That means that you can make changes any time up to the application of resin to the panel. Made a mistake on the glass orientation, disassemble the panel to the point of error, fix it and then reassemble the panel. You are not rushed at any stage of the panel assembly as nothing is final until you apply the resin and then it is all done at once, top, bottom, ends, everything.

we will get into more detail as we go along, but first, let's talk about the table. Here is a picture of a table half constructed so you can see the structure. Click on the picture for a larger view.


It is very important that the table is constructed strong so that it is stable and has no air leaks through the table where the panels meet. Using a biscuit joiner or some such will help with the alignment of the panels and using a good quality glue between the panels will help with the air leaks. A doubler of about 6 inches wide is placed below each joint and it is glued and screwed to the bottom of each side of the joint. The panels used here are 3/4 inch Melamine surfaced. The Melamine takes the wax and makes a very nice smooth surface for the gel coat on the panel and helps eliminate a lot of fairing later. Another all too unpleasant a job that is done away with or at least reduced to a minimum by using KSS.

The table needs to be a few feet longer than the panel you are building. Steve and Larisa are building a 42 foot boat so their table is 44 feet long. A couple of sheets extra for butt blocks so maybe 13 - 15 sheets for this setup.


Here is the finished table with a template to get started. The tape on the joints between the panels is to help with the air leaks.

I found a company who supplies farms with heavy duty white plastic sheets 10 feet wide by 50 feet long and 1/8 of an inch thick. This large piece of plastic is rolled up as a drum, with no creases or bends and would roll out on top of the table to eliminate any problems with air leaks. I have yet to find out the price of said sheet, but have asked for a quotation.

Tuesday, November 2, 2010

It gets better and better

I was most impressed by the last half hull Steve and Larisa built but the next one was even better. In Steve's own words again.....


Infused with 9.6 gallons resin in 35 minutes.
6-7 hrs of prep time today
3-4 hrs yesterday
4 hours before that


I am no expert, but you will have to agree, this is one fast and relative easy way to produce a hull for a boat. To help you understand the process, I will lay out the steps to produce one hull for a catamaran in my next blog entry.